To learn how to start a video podcast, you set up a camera, capture clean audio separately, light yourself well, then record video and sound together and publish to both video platforms (like YouTube and Spotify) and audio podcast directories. The single biggest mistake beginners make is treating it as a video project — in reality, the audio still matters most, because most people will listen rather than watch.
Audio first, video second
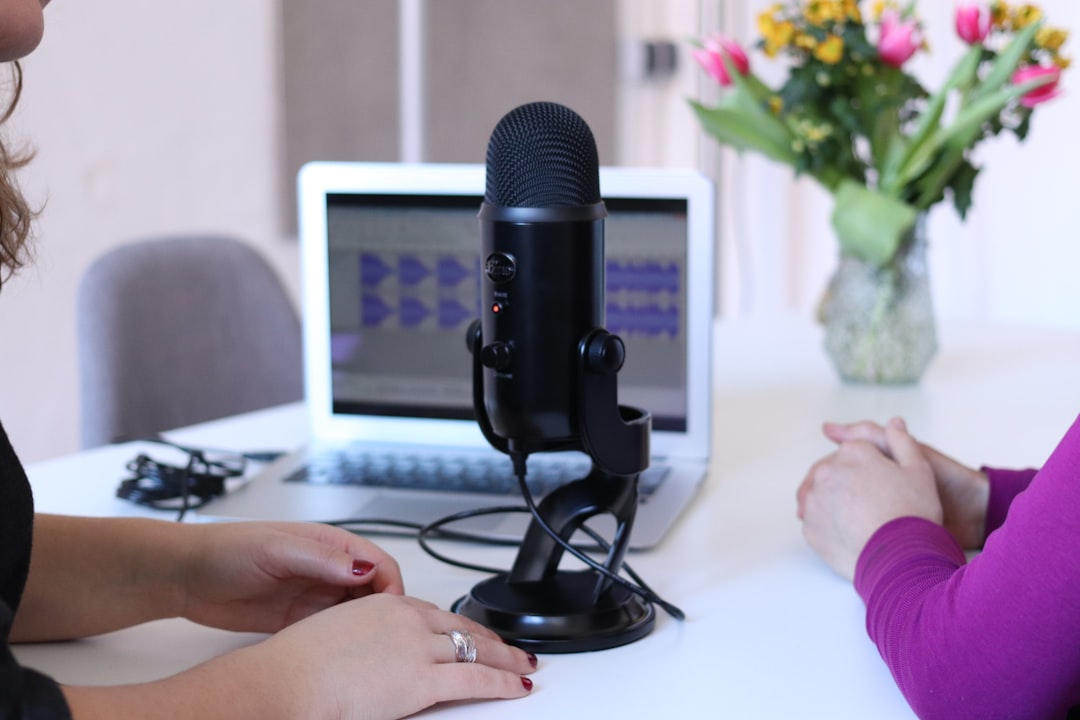
A video podcast is still a podcast. Viewers will forgive average lighting, but bad audio drives people away instantly. So treat your sound exactly as you would for an audio show: use a proper microphone rather than the camera’s built-in mic, record in a treated-ish room, and watch your levels. Our core guide on how to record a podcast at home applies fully here, and the best podcast microphones guide covers mic choices that suit a camera setup.
For multi-person video shows, give each person their own microphone on a separate track. That’s the same principle covered in how to record a solo podcast and remote-guest setups, just extended to a room with cameras.
The gear you actually need
You can scale this up over time. Start simple:
- Camera — a recent smartphone, a webcam, or a mirrorless/DSLR camera. A phone on a tripod is a perfectly good starting point.
- Microphone — a USB or XLR mic per speaker. Dynamic mics keep room noise down in untreated spaces.
- Lighting — one soft key light in front of you transforms the image. Avoid lighting from behind.
- Tripod or mount — keep the shot stable and at eye level.
- Backdrop — a tidy, non-distracting background reads as professional.
If you’re building a room for this, building a home studio on a budget and our wider home studio setup hub cover acoustics and space planning that help video shows too.
How to record a video podcast
You have two practical recording routes:
- In-person, in one room — point cameras at each speaker, capture each mic to a separate audio track, then sync in editing. Use a clap or a slate at the start so audio and video line up easily.
- Remote — use a platform that captures local video and audio for each guest, such as Riverside or SquadCast. These record each participant locally for higher quality than a plain video call, and they’re covered in our roundup of remote interview software.
Whatever the setup, record audio separately where you can. Camera audio is a useful safety reference and sync aid, but your finished sound should come from the dedicated mics.
Setting up your shot and framing
Once the sound is sorted, spend a few minutes on the picture — small fixes make an outsized difference. Set the camera at eye level so you’re not looking down at your audience, and frame yourself with a little headroom and your eyes roughly a third of the way down the frame. Sit far enough back that your hands and gestures are visible; a tight, claustrophobic crop feels tense on screen.
Position your key light slightly off to one side and above eye level so it wraps around your face rather than flattening it. A window can work as a free, flattering key as long as it’s in front of you, never behind. Watch the background too: a metre or two of distance between you and the wall adds a sense of depth, and clearing clutter from the shot does more for a professional look than any camera upgrade.
If you film multiple people or angles, lock the white balance and exposure manually so the cameras match. Auto settings drift between shots, which makes cutting between angles look jarring. A quick test recording before you start the real episode catches focus, framing and colour problems while they’re still easy to fix.
Editing and exporting two versions
You’ll typically produce two deliverables from one recording: a video file and an audio-only file. Edit the video in a video editor (or in Descript, which handles both), get the picture cuts right, then export the polished audio for your podcast feed. Clean the sound just as you would for audio — see how to edit a podcast — and check loudness against podcast LUFS standards so the audio version sounds right on its own.
A smart workflow is to record once and chop highlights into short clips for social platforms afterwards. That repurposing approach stretches a single session a long way.
When you edit the video, remember the audio-only listener can’t see anything. If you cut a long silence or a fluffed line out of the video, make the same cut in the audio so the two versions stay in step. Avoid edits that only make sense visually — pointing at something off-screen, or reacting to a graphic — or at least describe them out loud, so the audio version doesn’t leave listeners confused.
Publishing to video and audio platforms
A video podcast lives in two places at once:
- Video platforms — YouTube is the main home for the video version, and Spotify supports video episodes too.
- Audio directories — your podcast host distributes the audio-only version via your RSS feed to Apple Podcasts, Spotify and others.
Upload the video to YouTube and publish to Spotify, and push the audio file through your podcast host as normal. If you’re new to hosting and distribution, start with how to start a podcast, which walks through the publishing pipeline end to end.
Common mistakes to avoid
Most video podcast problems are predictable, which means they’re easy to sidestep once you know them:
- Relying on the camera mic. Built-in mics sound thin and pick up the whole room. Always record to a dedicated microphone and use the camera audio only for syncing.
- Lighting yourself from behind. A bright window or lamp behind you turns your face into a silhouette. Keep your main light in front.
- Forgetting the audio-only listener. Building an episode purely around what’s on screen leaves your podcast feed feeling broken. Treat the audio cut as a first-class version, not an afterthought.
- Letting levels drift. Set sensible gain before you start and monitor with headphones. Clipped, distorted audio can’t be repaired later.
- Skipping a test recording. Sixty seconds of test footage catches dead batteries, full memory cards and out-of-focus shots before they cost you a whole episode.
Frequently asked questions
Do I need an expensive camera to start a video podcast?
No. A modern smartphone or a decent webcam on a tripod is enough to begin. Invest in good audio and lighting first — those make a bigger difference to perceived quality than upgrading the camera.
Should I record video and audio at the same time?
Yes, record them together but capture audio to a dedicated microphone rather than relying on the camera mic. Use the camera’s audio as a sync reference, then replace it with the clean mic recording in editing.
Can I turn a video podcast into a normal audio podcast?
Absolutely, and you should. Export an audio-only version and distribute it through your podcast host so listeners on Apple Podcasts and Spotify can enjoy it without watching. Most of your audience will likely consume it that way.
How do I keep my audio and video in sync?
Record a sharp, visible sound at the start of each take — a hand clap or a slate works well — so you have a clear spike to line up the separate audio against the camera footage. Tools like Riverside and Descript can sync tracks automatically, but the clap is a reliable manual fallback if anything drifts.


